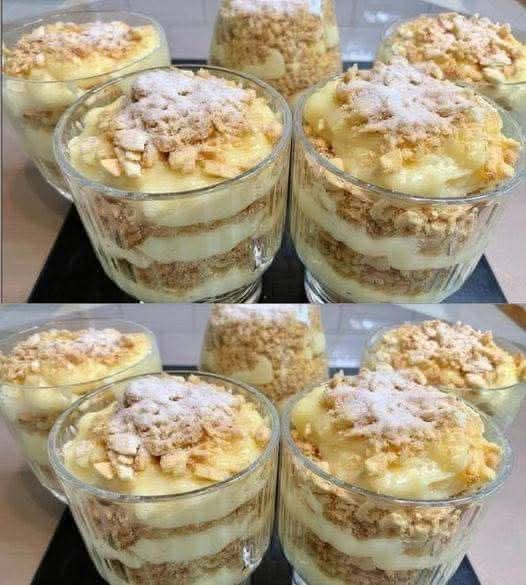
This no-bake creamy biscuit dessert is a simple yet elegant treat that is perfect for any occasion. With layers of rich, velvety cream and crunchy biscuits, it offers a delightful balance of textures and flavors. Whether you’re serving it in individual glasses for a stylish presentation or preparing it in a large dish for a family gathering, this dessert is sure to impress.
Why You’ll Love This Recipe
- No Baking Required: Quick and hassle-free, perfect for warm days or when you need a simple dessert.
- Customizable: You can enhance it with different flavors, fruits, or toppings.
- Elegant Yet Easy: Looks sophisticated but requires minimal effort.
- Perfect for Make-Ahead: Tastes even better after chilling, making it ideal for entertaining.
Ingredients
For the Creamy Layer:
- 1 cup (240ml) heavy cream (35% fat or higher)
- 4 oz (115g) cream cheese, softened
- 1/2 cup (60g) powdered sugar (icing sugar)
- 1 teaspoon vanilla extract
- Optional: 1-2 tablespoons of your favorite liqueur (e.g., amaretto, coffee liqueur) or flavorings (e.g., lemon zest, cocoa powder)
For the Biscuit Layer:
- 1 1/2 cups (approximately 150g) biscuits or cookies (e.g., digestive biscuits, graham crackers, shortbread cookies, vanilla wafers)
- Optional: 2-3 tablespoons melted butter, for a firmer biscuit base
For the Garnish:
- Powdered sugar (icing sugar)
- Additional crushed biscuits or cookies
- Optional: Chocolate shavings, fresh fruit, or cocoa powder
Step-by-Step Instructions
Step 1: Prepare the Biscuit Layer
- Crush the biscuits: Place them in a ziplock bag and crush with a rolling pin, or use a food processor. Aim for a mix of fine crumbs and slightly larger pieces for texture.
- Optional – Add butter: If you prefer a more solid base, mix the crushed biscuits with melted butter and stir until evenly moistened.
Step 2: Make the Creamy Layer
- Whip the heavy cream: Using a hand mixer or stand mixer with the whisk attachment, beat the heavy cream until soft peaks form. Set aside.
- Beat the cream cheese and sugar: In another bowl, blend the softened cream cheese with powdered sugar until smooth and creamy.
- Combine everything: Gently fold the whipped cream into the cream cheese mixture. Add the vanilla extract and any optional liqueur or flavorings. Stir until just combined. Do not overmix to keep the cream light and airy.
Step 3: Assemble the Dessert
Option 1: Individual Glasses (Elegant Presentation)
- Add a layer of crushed biscuits to the bottom of each glass.
- Spoon a layer of the creamy mixture on top.
- Repeat the layers until the glass is almost full, finishing with a layer of cream.
Option 2: Large Trifle Dish (Family-Style Serving)
- Spread a layer of crushed biscuits at the bottom of a trifle dish.
- Add a thick layer of the creamy mixture.
- Continue layering until all the ingredients are used, ending with the cream layer on top.
Step 4: Garnish and Chill
- Garnish: Sprinkle with powdered sugar and extra crushed biscuits. For a more decorative touch, add chocolate shavings, fresh berries, or a dusting of cocoa powder.
- Chill: Cover the dessert with plastic wrap and refrigerate for at least 2 hours (or overnight) to allow the flavors to meld and the cream to set.
Tips & Variations
Flavor Enhancements
- Lemon Zest & Juice: Add a fresh citrus twist for a bright, tangy flavor.
- Chocolate Lovers: Mix in cocoa powder for a rich chocolate version.
- Coffee Infusion: Add a tablespoon of espresso or strong brewed coffee for a mocha flavor.
Add Fresh Fruit
- Layer fresh or canned berries, peaches, or cherries between the biscuit and cream layers for a burst of flavor and color.
Make It Extra Indulgent
- Chocolate Drizzle: Drizzle melted chocolate over the top before serving.
- Nutty Crunch: Sprinkle crushed nuts (like almonds or hazelnuts) for added texture.
Important Notes for Success
- Use room temperature cream cheese to ensure a smooth, lump-free mixture.
- Do not overwhip the cream to prevent it from turning into butter.
- Be gentle when folding the whipped cream into the mixture to maintain its light and airy texture.
How to Store
- Refrigerate: Store in an airtight container for up to 3 days.
- Freezing Not Recommended: Due to the dairy content, freezing may alter the texture.
Final Thoughts
This no-bake creamy biscuit dessert is a dream come true for anyone who loves easy yet luxurious desserts. With its smooth, velvety texture and crunchy biscuit layers, it’s the perfect sweet treat for gatherings, celebrations, or simply indulging in a delightful homemade dessert.
Give it a try and enjoy the irresistible combination of creamy richness and biscuit crunch in every bite!